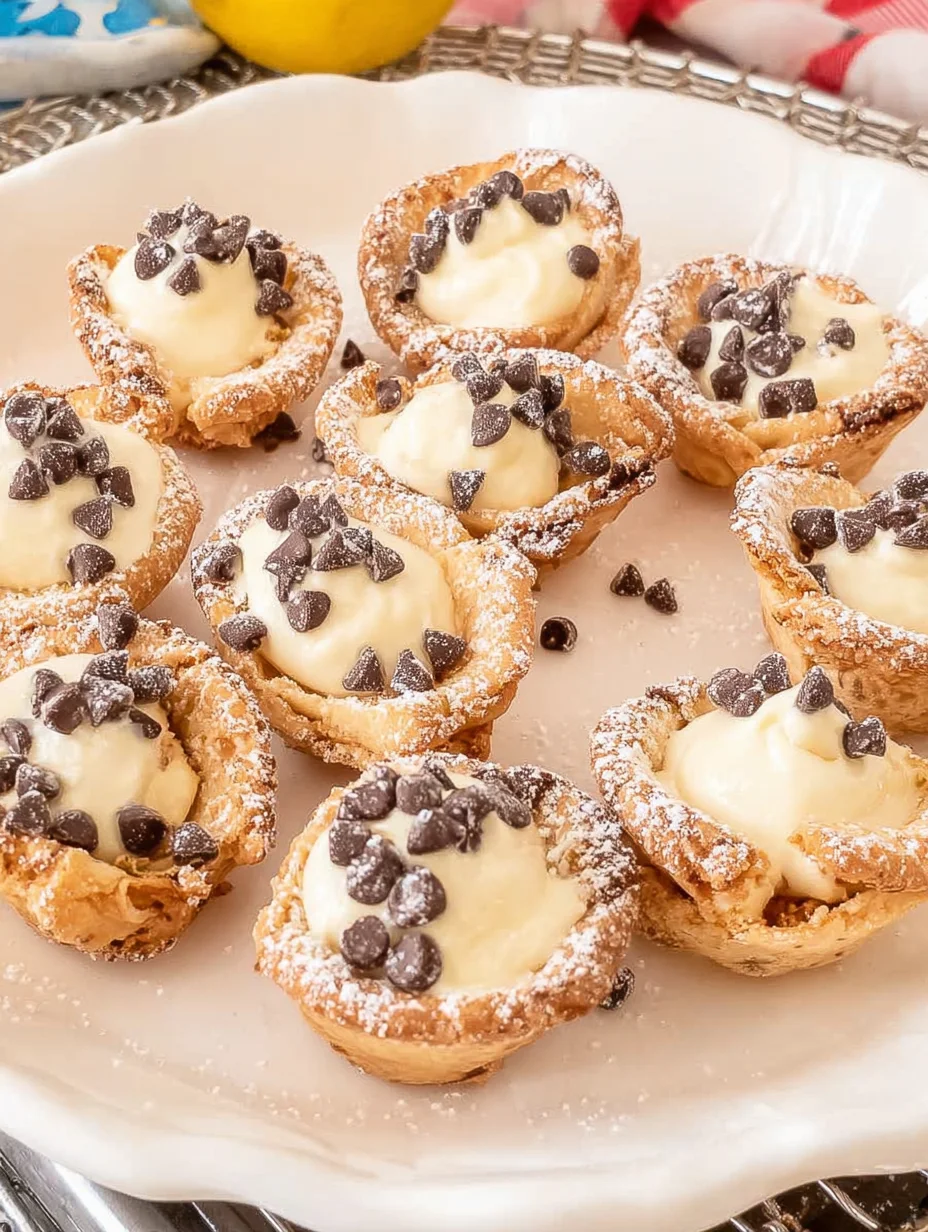
Mini Cannoli Cups
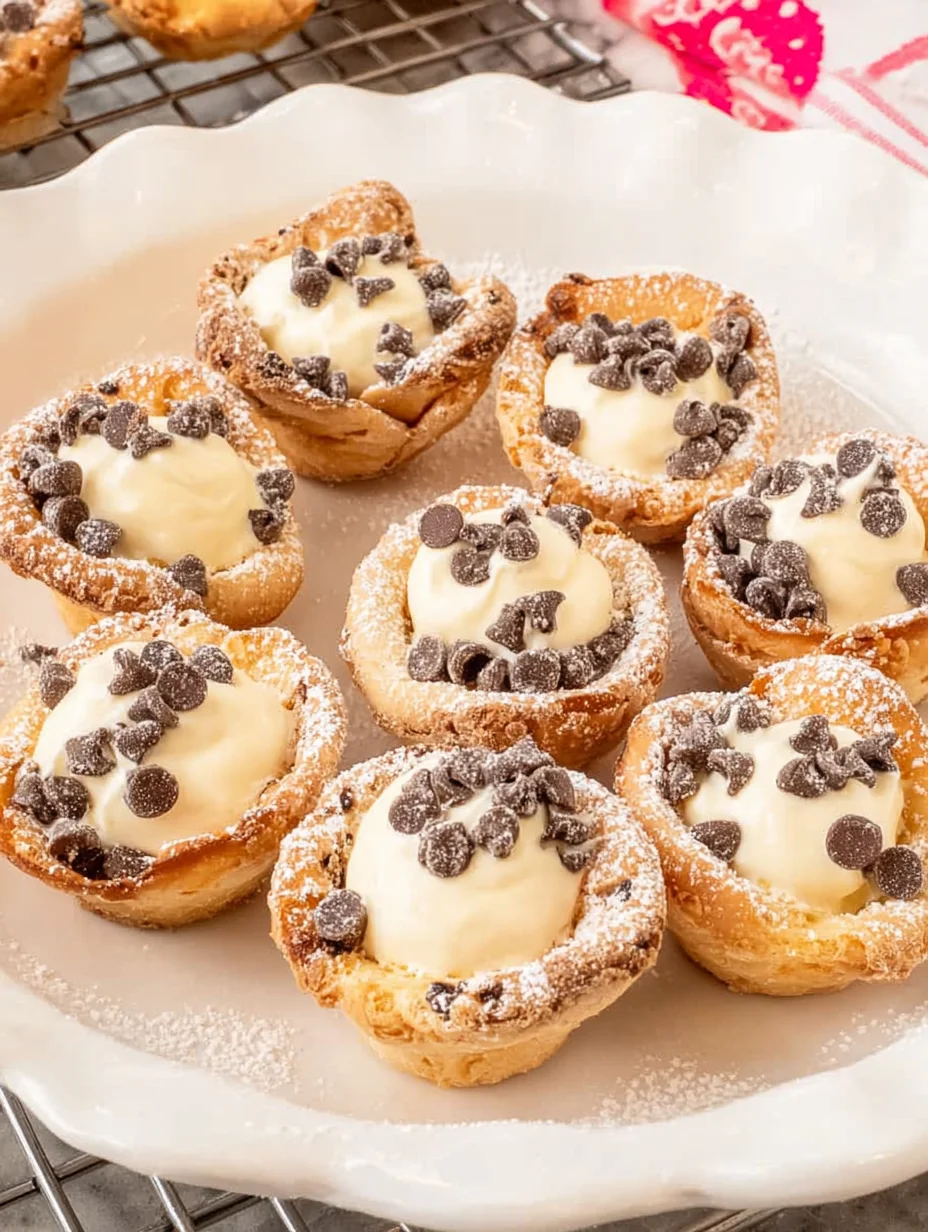
Have you ever craved the crispy, creamy delight of authentic Italian cannoli but felt intimidated by the traditional frying method? I know I have—those classic tubes can be a bit tricky to master at home. That’s why I’m so excited to share my go-to recipe for Mini Cannoli Cups, a simplified version that captures all the flavor without the hassle. These Mini Cannoli Cups use wonton wrappers baked into perfect little shells, filled with a rich ricotta cream that’s dotted with chocolate chips and pistachios. In my experience, they’re a huge hit at parties or as a sweet treat after dinner, and they’ve become a staple in my dessert rotation.
Let’s be honest, who doesn’t love a dessert that’s both elegant and easy? What I find interesting is how these Mini Cannoli Cups bring that old-world charm to your table in under an hour. I’ve tweaked this recipe over the years to make it foolproof, and now you can enjoy the same success. If you’re looking for a fun way to impress your guests, stick with me—I’ll walk you through every step.
Key Takeaways:
- Mini Cannoli Cups offer an authentic cannoli taste with a modern, bite-sized twist that’s perfect for gatherings.
- Prep and bake time totals around 30 minutes, saving you hours compared to traditional methods.
- The creamy ricotta filling bursts with sweet vanilla and chocolate notes for an irresistible flavor profile.
- Chill the filling briefly for easier piping and crispier Mini Cannoli Cups every time.
- Store unfilled shells in an airtight container for up to a week to enjoy fresh Mini Cannoli Cups on demand.
Why You’ll Adore These Mini Cannoli Cups
Effortless Elegance: There’s something magical about serving Mini Cannoli Cups that look like they came from a fancy bakery, but they’re surprisingly simple to make. In my kitchen experiments, I’ve found that the baked wonton cups hold their shape beautifully, giving you that professional touch without deep-frying. You’ll love how they elevate any occasion, from casual brunches to holiday desserts.
Grab This Chef Knife Now - Almost Gone!

- Stays Razor-Sharp: Ice-hardened blade keeps its edge longer than ordinary knives
- Superior Grip Control: Unique finger hole design gives you perfect balance and safety
- Built to Last a Lifetime: Premium stainless steel blade with elegant beech wood handle
- ✓ Finally, a knife that stays sharp and feels comfortable in my hand
- ✓ Professional quality without the premium price tag
- ✓ Makes meal prep faster and more enjoyable
⏰ Only a few items left in stock - order soon
Customizable Indulgence: What makes these Mini Cannoli Cups so special is how versatile they are—you can tweak the filling with seasonal fruits or nuts to suit your mood. I’ve added everything from lemon zest to espresso, and each variation feels fresh and exciting. It’s the kind of recipe that keeps you coming back, experimenting with new flavors that delight your taste buds.
Party-Ready Bites: These Mini Cannoli Cups are bite-sized perfection, meaning no messy plates or forks needed. Guests rave about popping one (or three!) into their mouths during get-togethers. Plus, they’re a lighter take on the classic, so you can enjoy more without the guilt.
Memorable Flavor Explosion: Imagine the crunch of the shell giving way to velvety ricotta sweetened just right—it’s pure bliss! I’ve shared these at family events, and they always spark conversations about Italian traditions. You’ll adore how they bring a touch of Sicily to your home with every delicious bite.
Essential Ingredients for Mini Cannoli Cups
Wonton Wrappers: These thin, square sheets are the base for your Mini Cannoli Cups, providing that essential crisp texture when baked. They’re readily available in the refrigerated section of most grocery stores and are incredibly versatile for other apps too. In my experience, using fresh ones ensures the shells don’t crack, making assembly a breeze. What I love is how they absorb just the right amount of butter for golden perfection without sogginess.
Grab This Kitchen Scale Now — Best Precision Pick!

- Razor-Accurate Every Time: Dual-increment precision down to 0.1g — perfect for baking, meal prep, and portion control with g, oz, ml, and fl'oz modes.
- Smart Removable Bowl Design: Detachable bowl doubles as a protective case for compact storage. Tare function lets you weigh ingredients in any container with zero fuss.
- Built for Everyday Convenience: Auto-zero, tare function, low battery alert, overload indicator, and 2-minute auto-off to extend battery life — all in a sleek stainless steel build.
- ✓ "Perfect for baking — precise, lightweight, and stores easily without wasting counter space"
- ✓ "A game changer! Weighing ingredients is now way more accurate than measuring cups"
- ✓ "Love the 0.1g precision and backlight — best food scale I've owned. Highly recommend!"
⏰ Only a few items left in stock - order soon
Ricotta Cheese: The star of the filling, whole-milk ricotta delivers a creamy, slightly tangy base that’s traditional in cannoli. Drain it well to avoid a watery mixture, which I’ve learned the hard way keeps your Mini Cannoli Cups firm and flavorful. It’s mildly sweet on its own, so it pairs beautifully with the powdered sugar and vanilla. This ingredient truly ties the dessert together with its authentic Italian essence.
Powdered Sugar and Vanilla Extract: Powdered sugar sweetens the ricotta smoothly without graininess, while vanilla extract adds a warm, aromatic depth to the filling for Mini Cannoli Cups. These pantry staples elevate the simple cheese into something luxurious and dessert-worthy. I’ve experimented with different vanillas, and pure extract always yields the best, most fragrant results in my recipes.
How to Make Mini Cannoli Cups
Prepare the Wonton Cups
Start by preheating your oven to 375°F and lightly greasing a mini muffin tin— this is key for those crisp Mini Cannoli Cups that pop right out. Take your wonton wrappers and gently press one into each cup, molding them carefully around the sides to form a shell shape. Brush the insides lightly with melted butter for extra golden crunch; in my experience, this step makes all the difference in texture. Bake for about 8 minutes until they’re lightly browned and fragrant, then let them cool completely on a wire rack. You’ll end up with sturdy little cups ready for filling, and the whole process feels so satisfyingly quick.
Mix the Ricotta Filling
While the shells cool, grab a bowl and combine the drained ricotta with powdered sugar, vanilla extract, and a pinch of cinnamon for that classic cannoli vibe. Stir until it’s smooth and creamy—aim for a pipeable consistency, which might take a couple of minutes of whisking. Fold in mini chocolate chips and chopped pistachios for bursts of flavor and crunch that make every Mini Cannoli Cups bite exciting. If it’s too soft, chill for 15 minutes; I’ve found this helps it hold shape beautifully when you fill the cups later. The aroma alone will have you eager to taste-test.
Assemble and Serve
Once everything’s ready, spoon or pipe the chilled filling into each cooled wonton cup, filling them generously but not to overflowing. For a fancy touch, dust the tops with more powdered sugar and garnish with a chocolate chip or pistachio sliver—these details turn your Mini Cannoli Cups into showstoppers. Let them sit for a few minutes to let the flavors meld, then serve immediately for the best crunch. If you’re prepping ahead, store the components separately until serving time to keep those shells crisp. Trust me, watching guests’ faces light up is the best part!
Ingredients
- 24 wonton wrappers
- 2 tablespoons melted butter
- 1 cup whole-milk ricotta cheese, drained
- 1/2 cup powdered sugar, plus extra for dusting
- 1 teaspoon vanilla extract
- 1/4 teaspoon ground cinnamon (optional)
- 1/4 cup mini chocolate chips
- 2 tablespoons chopped pistachios
Mini Cannoli Cups Instructions
- Preheat oven to 375°F. Grease a 24-cup mini muffin tin.
- Press a wonton wrapper into each muffin cup, brush insides with melted butter, and bake for 8 minutes until golden. Cool on a wire rack.
- In a bowl, mix ricotta, powdered sugar, vanilla, and cinnamon until smooth. Fold in chocolate chips and pistachios. Chill if needed.
- Pipe or spoon filling into cooled cups. Dust with powdered sugar and garnish. Serve immediately.
Pro Tips for the Best Mini Cannoli Cups
Drain the Ricotta Well: Place it in a cheesecloth-lined sieve over a bowl in the fridge for at least an hour to remove excess moisture, ensuring your Mini Cannoli Cups stay creamy but not runny.
Use Room Temperature Ingredients: Let the ricotta sit out briefly for smoother mixing; this prevents lumps and makes piping a dream.
Bake in Batches if Needed: If your muffin tin is smaller, work in batches to keep the wonton cups warm and pliable while assembling.
You Must Know
- Traditional cannoli shells are fried, but these baked Mini Cannoli Cups are lighter and less oily while maintaining authenticity.
- Always fill the cups right before serving to preserve the signature crunch against the soft filling.
- This recipe yields 24 Mini Cannoli Cups, perfect for sharing at events or portion control for sweet tooths.
- Gluten-free wonton wrappers are available for an inclusive twist on the classic dessert.
How to Store Mini Cannoli Cups
To keep your Mini Cannoli Cups fresh, store unfilled baked shells in an airtight container at room temperature for up to a week—they stay remarkably crisp. For filled ones, refrigerate in a single layer covered with plastic wrap for 1-2 days, though the shells may soften slightly from the moisture. If reheating, pop them in a 350°F oven for 2-3 minutes to revive the crunch, but avoid microwaving as it makes them soggy. I’ve found separating components is the best way to enjoy them longer without losing that delightful texture.
Customizing Your Mini Cannoli Cups
Feel free to swap the chocolate chips for dried cranberries or orange zest in the filling for a fruity Mini Cannoli Cups variation that screams holiday cheer. If you’re dairy-free, try a cashew-based ricotta alternative blended with coconut cream—it mimics the texture surprisingly well. For a boozy twist, add a splash of Marsala wine to the mix, as I’ve done for adult gatherings. Experimenting keeps things fun, and you can even draw inspiration from our charcuterie wreath recipe for sweet-savory pairings.
What to Serve with Mini Cannoli Cups
These Mini Cannoli Cups shine as a standalone dessert, but pairing them with a light espresso or cappuccino cuts through the sweetness beautifully. For a full Italian-inspired spread, serve alongside fresh berries or a simple fruit salad to balance the richness. If you’re hosting, add them to a dessert platter with biscotti and gelato scoops—it’s an effortless way to wow. In my experience, a glass of sweet Moscato wine complements the flavors without overpowering them.

Mini Cannoli Cups
Be the star of any party or get-together with these amazingly easy and delicious Mini Cannoli Cups! A real crowd-pleaser!
Timing
Recipe Details
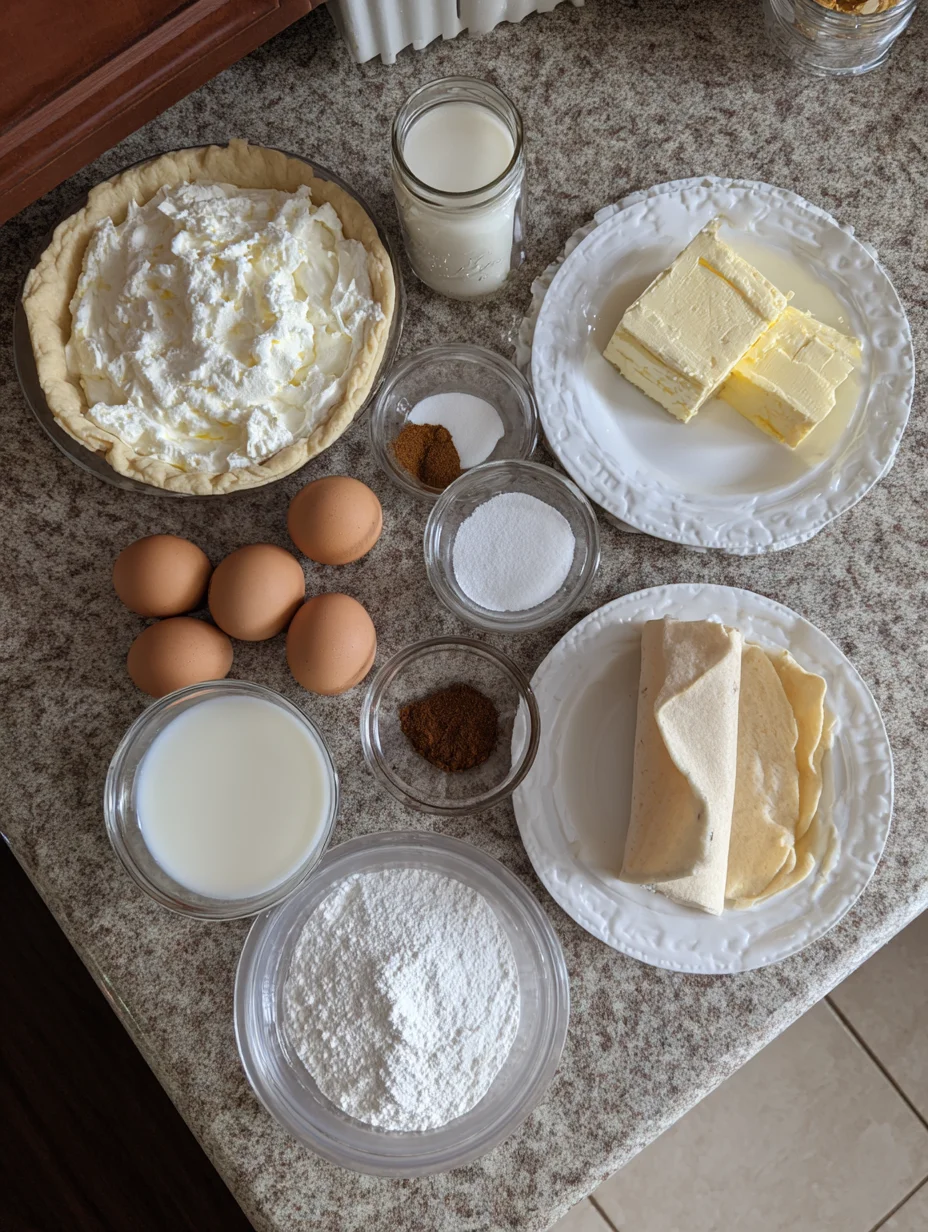
Ingredients
- 01 1 container whole-milk ricotta cheese (15 oz., drained)
- 02 1/2 cup powdered sugar
- 03 2 tablespoons granulated sugar
- 04 1 teaspoon finely grated orange or lemon zest
- 05 1/2 teaspoon vanilla extract
- 06 1 box refrigerated pie crusts, softened as directed on box (2 count)
- 07 3 tablespoons turbinado sugar (raw sugar)
- 08 1 teaspoon ground cinnamon
- 09 1/4 cup miniature semisweet chocolate chips or finely chopped pistachios
- 10 additional powdered sugar (for dusting)
Instructions
Preheat the oven to 425°F.
Lightly flour a work surface and unroll the pie crusts. Sprinkle both of the pie crusts with turbinado sugar and cinnamon. Gently roll a rolling pin over the top of the pie crusts to press the sugar and cinnamon into the dough. With a 2½-inch round cookie/biscuit cutter, cut out pastry rounds. Gently press each pastry round into ungreased mini muffin cups. (Note, you may need to gently re-roll the pie crusts and cut out more circles until you have 48 circles.)
Bake the crusts for 10 minutes, or until golden brown. Allow cannoli cups to cool completely in the pans, about 15 minutes, before removing them to a wire rack to cool completely.
While the cups are cooling, prepare the filling by beating all of the filling ingredients with an electric mixer on medium speed in a large mixing bowl until creamy. Place the filling in a 1-gallon zip-top resealable bag. Seal bag. Refrigerate until ready to serve.
Just before serving, remove the filling from the refrigerator. Snip one corner off of the bag and pipe approximately 1 tablespoon of filling into the cooled pastry cups. Sprinkle cups with mini chocolate chips or chopped pistachios. Dust with powdered sugar.
Serve immediately.
FILED UNDER:
NUTRITION FACTS (PER SERVING)
Nutrition information is calculated using an ingredient database and should be considered an estimate. In cases where multiple ingredient alternatives are given, the first listed is calculated for nutrition. Garnishes and optional ingredients are not included.
Frequently Asked Questions About Mini Cannoli Cups
Can I make Mini Cannoli Cups ahead of time?
Absolutely, bake the shells up to a week in advance and store them airtight. Prepare the filling a day ahead, then assemble just before serving to keep the Mini Cannoli Cups crispy. This make-ahead strategy is a lifesaver for busy hosts like me.
How long do Mini Cannoli Cups last in the fridge?
Filled Mini Cannoli Cups hold up in the fridge for 1-2 days, covered loosely to prevent sogginess. Beyond that, the shells lose their crunch, so enjoy them fresh. I’ve learned to only fill what you’ll eat soon for the best experience.
Are Mini Cannoli Cups gluten-free?
Not with standard wonton wrappers, but you can easily swap in gluten-free versions available at most stores. The rest of the ingredients are naturally gluten-free, making this a quick adaptation. Just check labels to be sure.
Can I freeze Mini Cannoli Cups?
Freeze unfilled shells in a single layer for up to a month, then thaw at room temp before using—your Mini Cannoli Cups will crisp right up in the oven. Avoid freezing the filled ones, as the dairy doesn’t thaw well and can separate. This tip has saved me during holiday prep.
What if I don’t have a mini muffin tin?
No worries—use a regular muffin tin and trim the wonton wrappers to fit, or even shape them over an inverted cup on a baking sheet. It might take a bit more creativity, but the results are still delicious Mini Cannoli Cups. For more baking hacks, check our air fryer gnocchi recipe.
How do I prevent the Mini Cannoli Cups from getting soggy?
The secret is assembling right before serving and using well-drained ricotta to minimize moisture in your Mini Cannoli Cups. If storing briefly, a light sprinkle of powdered sugar on the shells absorbs excess humidity. Patience with timing makes all the difference.
Can I use store-bought cannoli shells for this recipe?
Yes, if you’re short on time, but homemade baked ones are fresher and cheaper. Fill them the same way for quick Mini Cannoli Cups. It’s a great shortcut for last-minute desserts.
What’s the calorie count for Mini Cannoli Cups?
Each one is around 80-100 calories, depending on add-ins—light for a treat! To lighten further, use part-skim ricotta. They’re indulgent yet balanced, perfect for satisfying cravings.
Final Thoughts
From the first crunchy bite to the last creamy trace, these Mini Cannoli Cups have won over my family and friends time and again, blending tradition with everyday ease. I hope this recipe brings a little Italian joy to your kitchen—give it a whirl and let me know how your Mini Cannoli Cups turn out! Tag us in your creations or explore more sweet ideas on the site; you won’t be disappointed.