Fried Chicken Breast Recipe

Nothing beats the satisfying crunch of a perfectly Fried Chicken Breast, does it? I remember the first time I tried making it at home—it was a game-changer for our family dinners. That golden, crispy exterior hiding a juicy, tender inside? It’s the kind of comfort food that brings everyone to the table with a smile. In this recipe, we’re diving into how to create the ultimate Fried Chicken Breast that’s not just delicious but also straightforward to whip up on a busy weeknight.
I’ve tweaked this Fried Chicken Breast over the years to get that ideal balance of flavor and texture, drawing from classic Southern techniques but making it accessible for any home cook. Whether you’re craving something hearty or just want to impress with homemade Fried Chicken Breast, this guide has you covered. Let’s get into it—I’m excited to share every step so you can enjoy this crispy delight too.
Key Takeaways:
- This Fried Chicken Breast delivers crispy perfection with juicy results every time.
- Ready in under 30 minutes, making it a quick weeknight winner.
- Bursting with savory seasonings for unbeatable flavor.
- Pat the chicken dry for the crispiest coating possible.
- Store leftovers in the fridge for up to 3 days and reheat in the oven.
Why You’ll Adore This Fried Chicken Breast
Crispy and Juicy Every Bite: There’s something magical about biting into Fried Chicken Breast that has that shatteringly crisp crust while staying moist inside—it’s what keeps me coming back. In my experience, the double-dredge method we use here locks in all the goodness without drying out the meat. You’ll love how it transforms simple chicken into a restaurant-worthy treat.
Grab This Chef Knife Now - Almost Gone!

- Stays Razor-Sharp: Ice-hardened blade keeps its edge longer than ordinary knives
- Superior Grip Control: Unique finger hole design gives you perfect balance and safety
- Built to Last a Lifetime: Premium stainless steel blade with elegant beech wood handle
- ✓ Finally, a knife that stays sharp and feels comfortable in my hand
- ✓ Professional quality without the premium price tag
- ✓ Makes meal prep faster and more enjoyable
⏰ Only a few items left in stock - order soon
Quick and Effortless Prep: Who has time for complicated recipes? This Fried Chicken Breast comes together in no time, perfect for those evenings when you’re short on hours but long on hunger. I find it so rewarding to have dinner on the table fast without sacrificing taste—it’s a lifesaver for busy parents like me.
Versatile Flavor Profile: Seasoned just right, this Fried Chicken Breast pairs with everything from salads to mashed potatoes. What I love is how you can tweak the spices to match your mood, whether it’s a hint of cayenne for heat or herbs for a milder vibe. It’s endlessly adaptable and always a crowd-pleaser.
Family-Friendly Comfort: Let’s be honest, Fried Chicken Breast screams home-cooked love. My kids devour it, and it’s become our go-to for casual gatherings. The aroma alone fills the house with warmth, making every meal feel special and inviting.
Essential Ingredients for Fried Chicken Breast
Boneless Chicken Breasts: These are the star of your Fried Chicken Breast, providing that lean protein base that’s easy to work with and cooks evenly. I always choose fresh, plump ones about 6-8 ounces each for the best results—they absorb the marinade beautifully without falling apart. Opt for organic if possible; it really elevates the tenderness and flavor in the final dish.
Grab This Kitchen Scale Now — Best Precision Pick!

- Razor-Accurate Every Time: Dual-increment precision down to 0.1g — perfect for baking, meal prep, and portion control with g, oz, ml, and fl'oz modes.
- Smart Removable Bowl Design: Detachable bowl doubles as a protective case for compact storage. Tare function lets you weigh ingredients in any container with zero fuss.
- Built for Everyday Convenience: Auto-zero, tare function, low battery alert, overload indicator, and 2-minute auto-off to extend battery life — all in a sleek stainless steel build.
- ✓ "Perfect for baking — precise, lightweight, and stores easily without wasting counter space"
- ✓ "A game changer! Weighing ingredients is now way more accurate than measuring cups"
- ✓ "Love the 0.1g precision and backlight — best food scale I've owned. Highly recommend!"
⏰ Only a few items left in stock - order soon
All-Purpose Flour: The foundation of the crispy coating, flour helps create that golden dredge that clings perfectly during frying. Mixed with spices, it seasons the Fried Chicken Breast from the outside in, giving each bite a subtle crunch. I’ve found that sifting it prevents lumps, ensuring a smooth, even layer every time.
Eggs and Breadcrumbs: Eggs act as the glue for the coating, while breadcrumbs deliver the ultimate crunch in your Fried Chicken Breast. Use panko for extra lightness or regular for a classic texture—I prefer a mix for variety. These ingredients bind everything together, creating that irresistible contrast between crisp outside and juicy inside.
How to Make Fried Chicken Breast
Prepare the Chicken
Start by patting your chicken breasts dry with paper towels—this step is crucial for the Fried Chicken Breast to achieve maximum crispiness. In a bowl, whisk together buttermilk, salt, pepper, and a dash of hot sauce if you like a kick; submerge the chicken and let it marinate in the fridge for at least 30 minutes. I always do this ahead because it infuses so much flavor, making the meat tender and ready for the next coat. Once done, remove and let excess liquid drip off before proceeding.
Dredge and Coat
Set up three shallow dishes: one with seasoned flour, one with beaten eggs, and one with breadcrumbs mixed with herbs and parmesan. Dip each marinated piece first in flour, shaking off excess, then into the egg, and finally press into the breadcrumbs for a thick, even layer on your Fried Chicken Breast. This double-dredging technique, which I’ve perfected over trials, ensures the coating stays put during frying and gives that satisfying crunch. Pro tip: Let the coated chicken rest on a wire rack for 10 minutes to set the breading.
Fry to Golden Perfection
Heat vegetable oil in a deep skillet to 350°F—use a thermometer for accuracy to avoid soggy results. Carefully add the breaded chicken pieces, frying in batches for 6-8 minutes per side until golden and the internal temperature hits 165°F for safe, juicy Fried Chicken Breast. Drain on paper towels to keep it crisp, and season lightly with salt right out of the oil. The sizzle and aroma will have everyone hovering in the kitchen, trust me—it’s worth every minute.
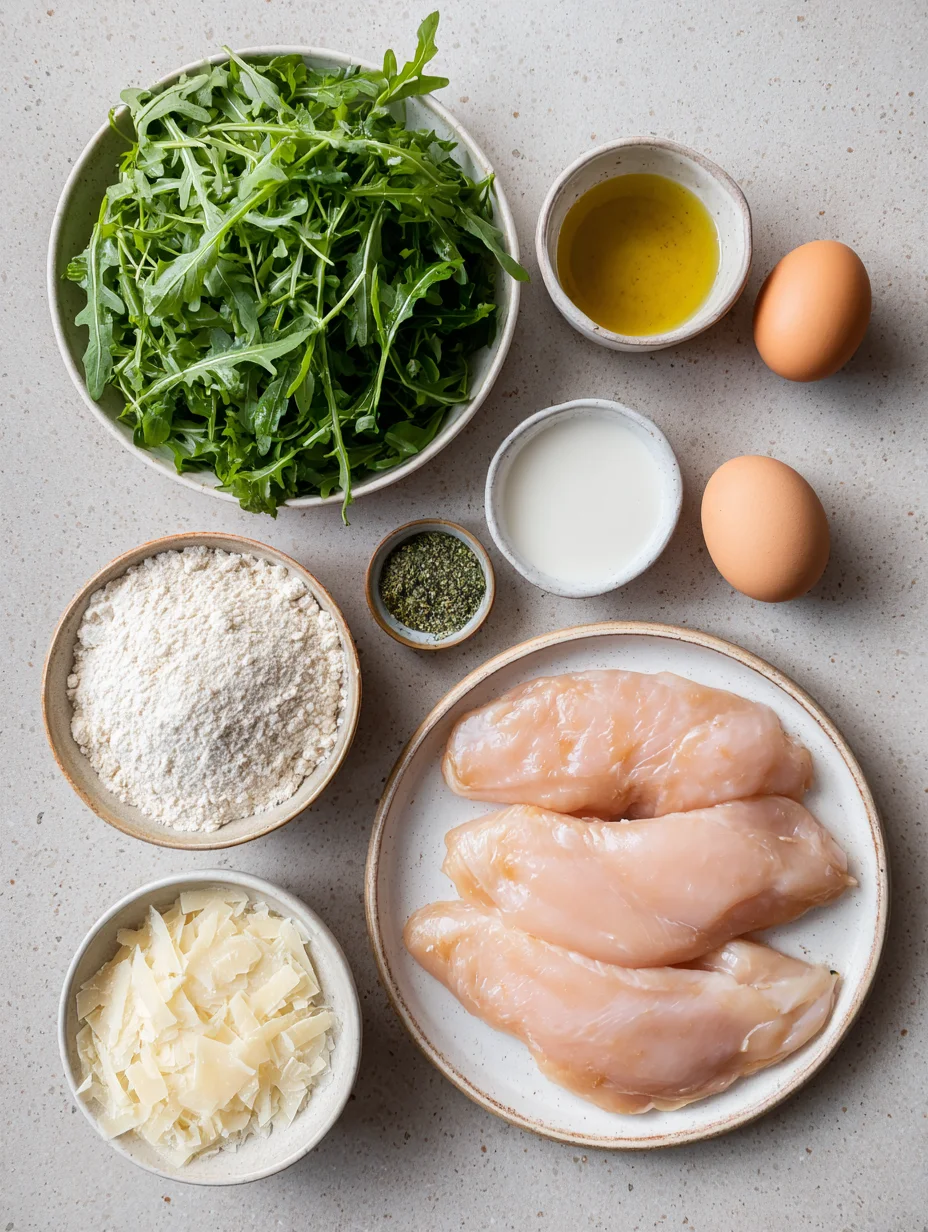
Ingredients
- 4 boneless, skinless chicken breasts (about 1.5 lbs)
- 1 cup buttermilk
- 1 cup all-purpose flour
- 2 large eggs, beaten
- 1.5 cups panko breadcrumbs
- 1 tsp salt
- 1 tsp black pepper
- 1 tsp garlic powder
- 1 tsp paprika
- Vegetable oil for frying
- Optional: 1/2 tsp cayenne pepper for heat
Fried Chicken Breast Instructions
- Marinate the chicken breasts in buttermilk mixed with salt, pepper, and optional hot sauce for 30 minutes in the fridge.
- Set up dredging stations: flour with seasonings in one bowl, beaten eggs in another, and breadcrumbs with garlic powder and paprika in the third.
- Dredge each chicken breast in flour, then egg, then breadcrumbs, pressing to adhere.
- Heat 1/2 inch of oil in a skillet to 350°F.
- Fry chicken for 6-8 minutes per side until golden and cooked through (165°F internal temp).
- Drain on paper towels and serve hot.
Pro Tips for the Best Fried Chicken Breast
Don’t Skip the Marinade: Buttermilk tenderizes the meat beautifully, leading to juicier Fried Chicken Breast—marinate overnight if you can for even better results.
Oil Temperature Matters: Keep it at 350°F to avoid greasy or undercooked pieces; a candy thermometer helps immensely here.
Rest Before Serving: Let your Fried Chicken Breast sit for a few minutes post-fry to lock in juices and maintain crispiness.
You Must Know
- Fried Chicken Breast is best enjoyed fresh, but leftovers reheat well in the oven at 375°F for 10 minutes.
- Always use a meat thermometer to ensure it reaches 165°F for safety.
- The breading can be made gluten-free with appropriate flour and crumbs swaps.
- This recipe serves 4; double it for meal prep without issues.
How to Store Fried Chicken Breast
To keep your Fried Chicken Breast tasting great, store it in an airtight container in the fridge where it lasts up to 3 days. For longer storage, freeze portions wrapped in foil for up to 2 months—thaw overnight before reheating. I recommend the oven at 350°F for 15 minutes to restore crispiness without sogginess, or an air fryer for a quick crisp-up. It’s versatile even as leftovers!
Customizing Your Fried Chicken Breast
Want to switch things up? Try adding herbs like thyme to the breadcrumbs or using chicken tenders for bite-sized Fried Chicken Breast that’s perfect for kids. If you’re watching calories, bake at 425°F instead of frying for a lighter version—still delicious! For spice lovers, incorporate chili powder in the flour dredge. Check out our chicken marinade recipes for more ideas to personalize this classic.
What to Serve with Fried Chicken Breast
Pair your Fried Chicken Breast with creamy coleslaw and cornbread for a Southern twist that’s hearty and refreshing. A simple green salad with vinaigrette cuts through the richness, while mashed potatoes with gravy make it a full comfort meal. For beverages, iced tea or lemonade complements the flavors perfectly—don’t forget pickles on the side for that tangy crunch.
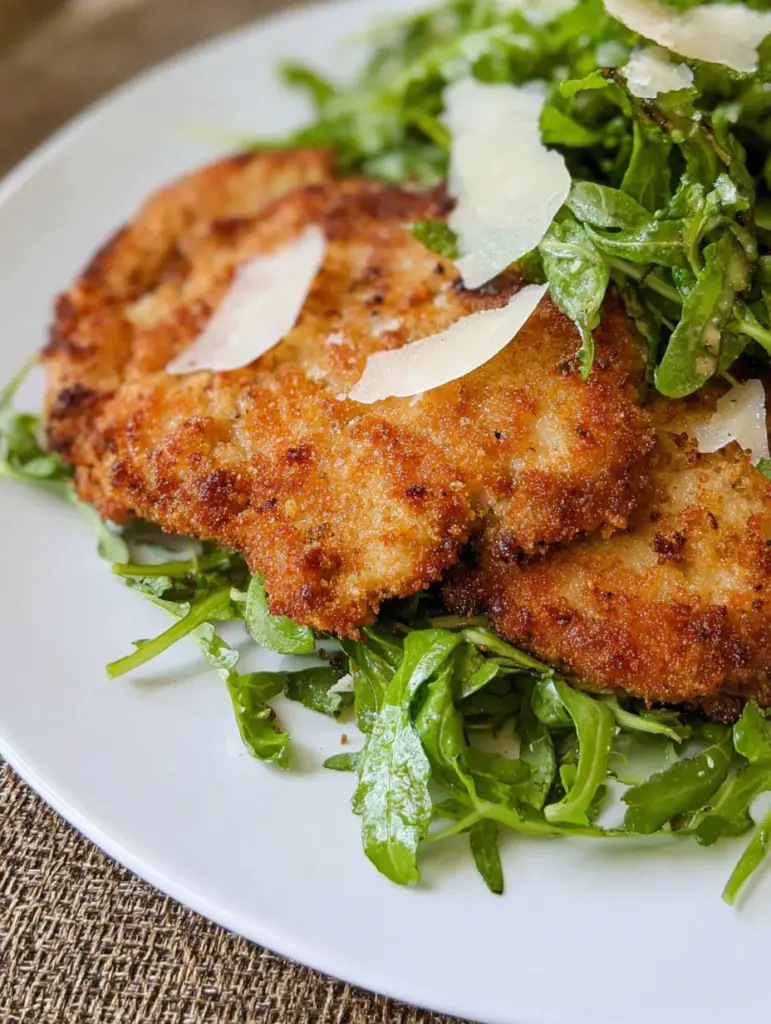
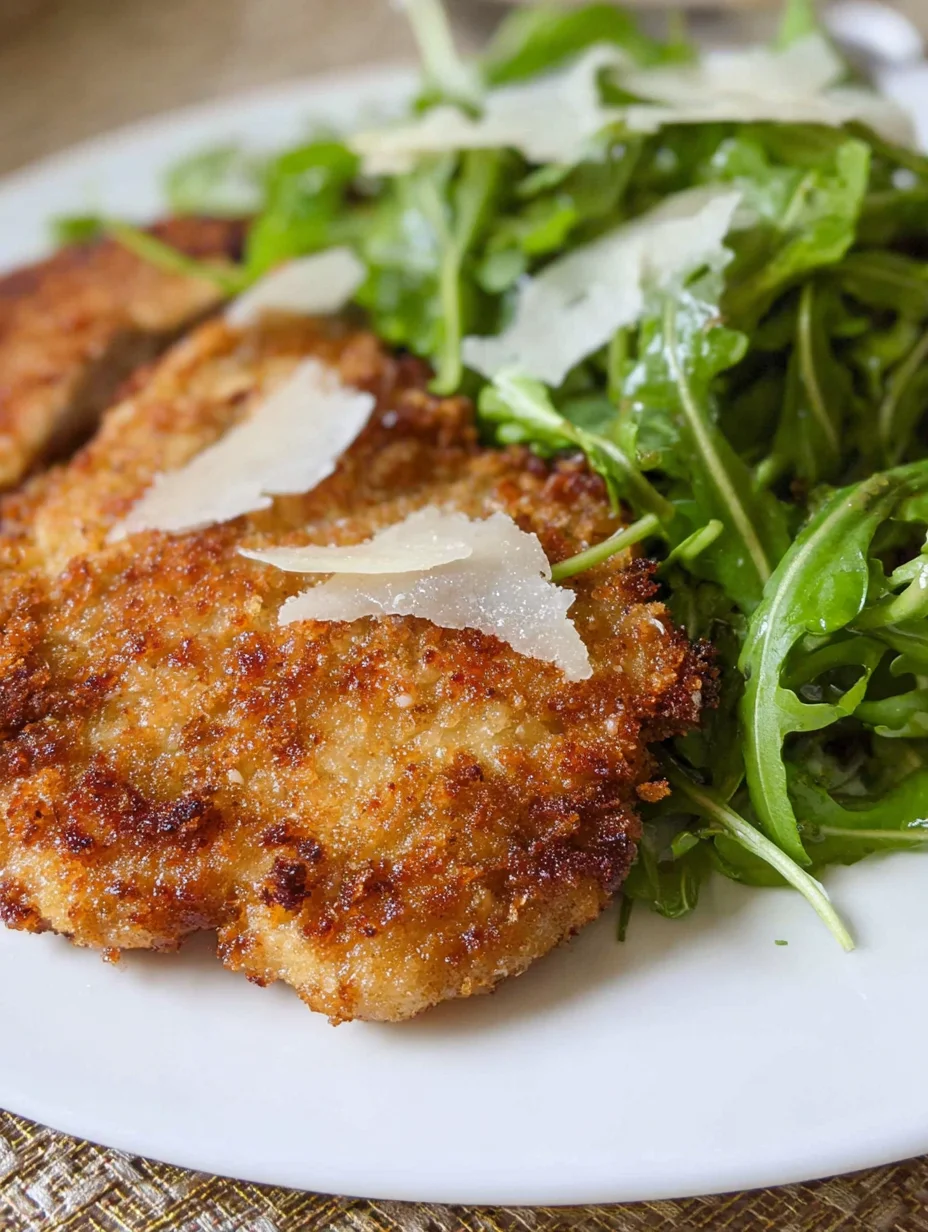
Fried Chicken Breast Recipe
This crispy fried chicken breast recipe is topped with arugula, shaved parmesan cheese, and a delicious lemon vinaigrette!
Timing
Recipe Details
Ingredients
- 01 4 thin chicken breasts
- 02 1 pint buttermilk
- 03 3/4 cup all-purpose flour
- 04 3/4 cup panko bread crumbs
- 05 1 egg
- 06 2 teaspoons salt
- 07 1 teaspoon garlic powder
- 08 1 teaspoon pepper
- 09 4 cups baby arugula ((loosely packed))
- 10 4 tablespoons shaved parmesan cheese
- 11 2 tablespoons olive oil
- 12 2 tablespoons butter
- 13 2 tablespoons lemon juice
- 14 1/4 cup olive oil
- 15 salt and pepper (to taste)
FILED UNDER:
NUTRITION FACTS (PER SERVING)
Nutrition information is calculated using an ingredient database and should be considered an estimate. In cases where multiple ingredient alternatives are given, the first listed is calculated for nutrition. Garnishes and optional ingredients are not included.
Frequently Asked Questions About Fried Chicken Breast
Can I make Fried Chicken Breast ahead of time?
Yes, you can bread and fry it up to 2 hours in advance, then reheat in a 350°F oven for 10 minutes to refresh the crisp. Just store uncovered in the fridge to avoid sogginess. It’s a great trick for parties!
How long does Fried Chicken Breast last in the fridge?
Your Fried Chicken Breast stays good for 3-4 days when kept in an airtight container. Beyond that, freeze it to extend freshness. Always check for any off smells before eating.
Is Fried Chicken Breast healthy?
While fried, it can be balanced with lean chicken and portion control—opt for less oil or air-frying for a lighter take. Pair with veggies to make it a nutritious meal overall.
Can I use an air fryer for this recipe?
Absolutely, and it works wonders for Fried Chicken Breast—spray with oil and cook at 400°F for 15-18 minutes, flipping halfway. See our air fryer chicken breast recipe for tips on that method too.
What oil is best for frying?
Vegetable or canola oil handles high heat well without burning, keeping your Fried Chicken Breast light and crispy. Avoid olive oil as it smokes at lower temps.
How do I know when Fried Chicken Breast is done?
Use a meat thermometer to hit 165°F internally—juices should run clear too. Overcooking dries it out, so err on the side of caution with thinner pieces.
Can I bake Fried Chicken Breast instead?
Yes, preheat to 425°F, place on a wired rack, and bake for 20-25 minutes after breading. It mimics frying for crispiness without the oil mess.
What’s the secret to extra crispy Fried Chicken Breast?
The double-dredge and resting the breaded pieces before frying are key—plus, pat the chicken super dry first. For oven versions, a quick broil at the end adds extra crunch.
Final Thoughts
There’s truly nothing like sinking your teeth into homemade Fried Chicken Breast—crispy, flavorful, and full of that homey vibe we all crave. I hope this recipe becomes a staple in your kitchen, just like it has in mine. Give it a try this weekend and let me know how it turns out; tag us on social for your crispy creations!